vue学习系列-生命周期

vue开发也三周了,边学习边用,好在之前用过react能快速的看文档应付项目。

暂时还没有看过vue源码,本篇仅记录应用型测试了解生命周期各种钩子函数,更好的控制数据流和其对DOM的影响。

基础代码:

1
2
3
4
5
6
7
8
<template>
<div>
<input type="text" name="lifecycleTest" v-model="msg" ref="input">
<p>{{msg}}</p>
<button @click="changeMsg">change</button>
<button @click="destroy">destroy</button>
</div>
</template>
1
2
3
4
5
6
7
8
9
10
11
12
13
14
15
16
17
18
19
20
21
22
23
24
25
26
27
28
29
30
31
32
33
34
35
36
37
38
39
40
41
42
43
44
45
46
47
48
49
50
51
52
53
54
55
56
57
58
59
60
61
62
63
64
65
66
67
68
69
70
71
72
73
74
75
76
77
<script>
export default {
name: 'lifecycle',
data () {
return {
msg: 'lifecycle'
}
},

// ----------beforeCreat----------
beforeCreat: function () {
console.log('beforeCreat---vm', this.msg)
console.log('beforeCreat---Dom', this.$refs.input.value)
},

// ----------created----------
created: function () {
console.log('created---vm', this.msg)
console.log('created---Dom', this.$refs.input ? this.$refs.input.value : 'Dom还未渲染')
this.$nextTick(function () {
console.log('created---Dom---nextTick', this.$refs.input ? this.$refs.input.value : 'Dom还未渲染')
})
},

// ----------beforeMount----------
beforeMount: function () {
console.log('beforeMount---vm', this.msg)
console.log('beforeMount---Dom', this.$refs.input ? this.$refs.input.value : 'Dom还未渲染')
},

// ----------mounted----------
mounted: function () {
console.log('mounted---vm', this.msg)
console.log('mounted---Dom', this.$refs.input.value)
},

// ----------watch----------
watch: {
msg: function () {
console.log('watch---', this.msg)
}
},

// ----------beforeUpdate----------
beforeUpdate: function () {
console.log('beforeUpdate---vm', this.msg)
console.log('beforeUpdate---Dom', this.$refs.input.value)
},

// ----------updated----------
updated: function () {
console.log('updated---vm', this.msg)
console.log('updated---Dom', this.$refs.input.value)
},

// ----------beforeDestroy----------
beforeDestroy: function () {
console.log('beforeDestroy---vm', this.msg)
console.log('beforeDestroy---Dom', this.$refs.input.value)
},

// ----------destroyed----------
destroyed: function () {
console.log('destroy---vm', this.msg)
console.log('destroy---Dom', this.$refs.input ? this.$refs.input.value : 'vue与Dom解绑了')
},

methods: {
changeMsg: function () {
this.msg = 'lifecycle2'
},
destroy: function () {
this.$destroy()
}
}
}
</script>

结果:

说明:

  • created

    vue实例创建完毕,监测数据、初始化事件等等,此阶段能访问vue数据,不能访问到DOM(因为还没有渲染呢),若想在此阶段写DOM操作代码,可以使用nextTick函数回调,在mounted结束后立即执行;

  • beforeMount

    确立了挂载点,但是还没渲染DOM,所以依然获取不到DOM,属于重要的过渡阶段;

  • mounted

    DOM渲染完毕,可以访问DOM了;

  • beforeUpdate

    改变数据后其实先进去watch中的,之后进入此阶段,数据已更新,但是Dom还未更新,其实在这阶段生成了新的绑定vue实例数据的虚拟DOM结构;

  • updated

    生成virtual Dom,和之前的虚拟Dom进行differ算法对比,最小变动更新Dom完毕

  • beforeDestroy

    实例销毁之前,依然能正常访问数据和DOM;

  • destroyed

    销毁之后,数据能访问到,但是不能访问DOM了,改变数据不存在数据驱动;

总结:

  • beforeCreat

    vue实例创建之前可以在此加入loding事件

  • created

    loding可以消除了,实例已创建,可以在此发起ajax请求拉取数据,来做数据的进一步初始化

  • mounted

    操作DOM,也可以发起后端请求,配合路由钩子做事情

  • updated

    如果做统一数据处理,可以写上相应函数

  • beforeDestroy

    离开前的确认框

  • nextTick

    更新数据后立即操作DOM

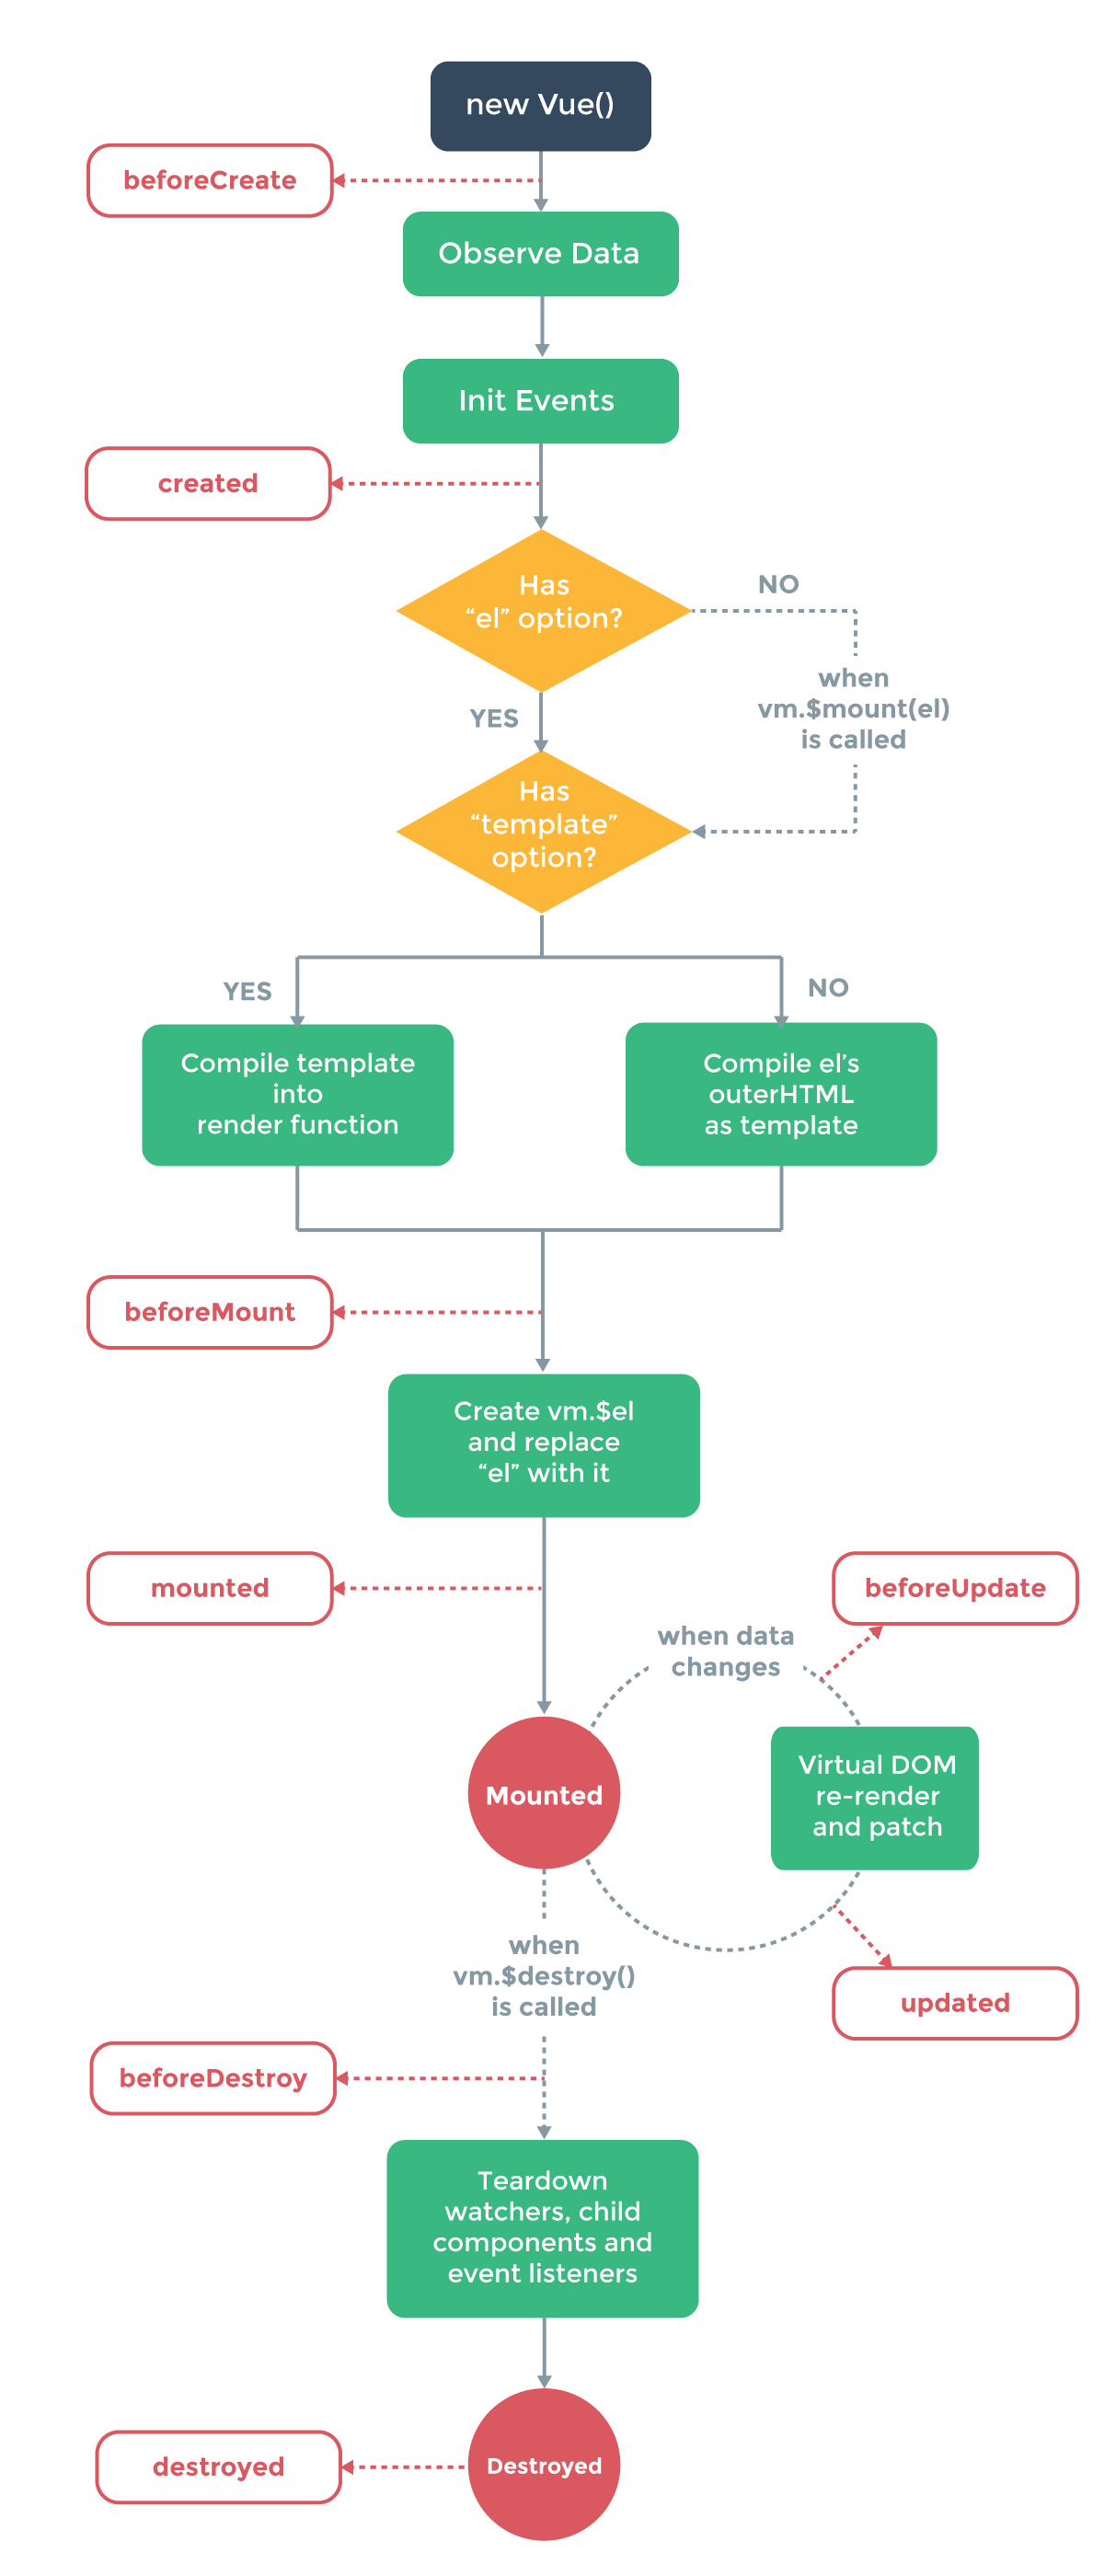
最后上个官方生命周期流程图,后面还有番外篇!

生命周期流程图

番外篇1:

除此之外做了些尝试

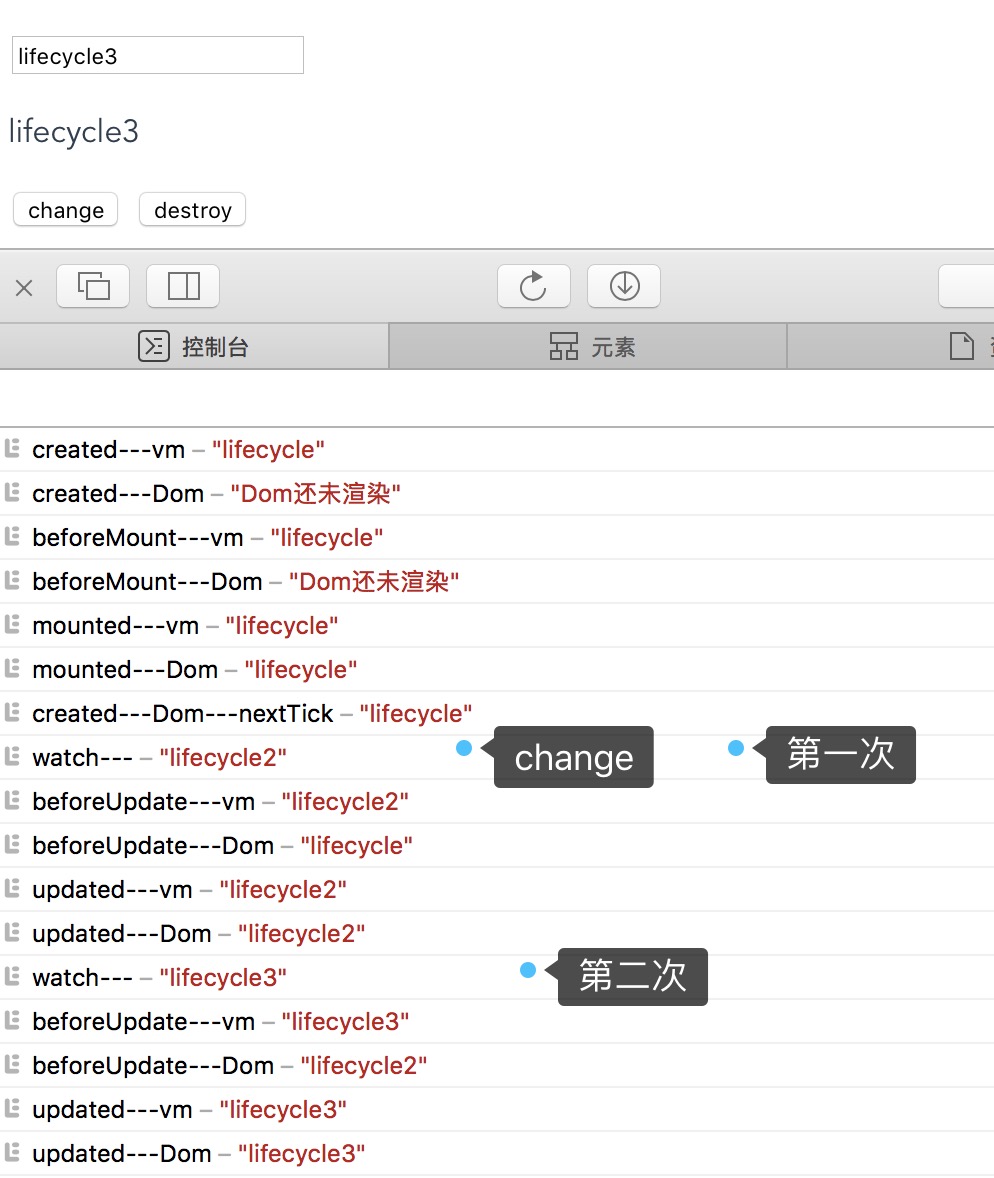
连续改变vue数据,例如点击按钮事件中连续两次更改data,更改代码如下:

1
2
3
4
5
6
7
8
...
methods: {
changeMsg: function () {
this.msg = 'lifecycle2'
this.msg = 'lifecycle3'
}
}
...

或者

1
2
3
4
5
6
7
8
9
10
11
...
methods: {
changeMsg: function () {
this.msg = 'lifecycle2'
this.changeMsgAgin()
},
changeMsgAgin: function () {
this.msg = 'lifecycle3'
}
}
...

酱紫写只会触发一次beforeUpdateupdated,结果是最终结果

但是如果使用timeout,即便是执行时间写成0,也会触发两次beforeUpdateupdated,更改代码如下

1
2
3
4
5
6
7
8
9
10
...
methods: {
changeMsg: function () {
this.msg = 'lifecycle2'
setTimeout(function () {
self.msg = 'lifecycle3'
}, 5)
}
}
...

或者

1
2
3
4
5
6
7
8
9
10
11
12
13
14
...
methods: {
changeMsg: function () {
this.msg = 'lifecycle2'
this.changeMsgAgin()
},
changeMsgAgin: function () {
const self = this
setTimeout(function () {
self.msg = 'lifecycle3'
}, 5)
}
}
...

结果如下,跑了两次beforeUpdateupdated

在vue实例创建完成后,但是在mounted结束之前,改变data数据

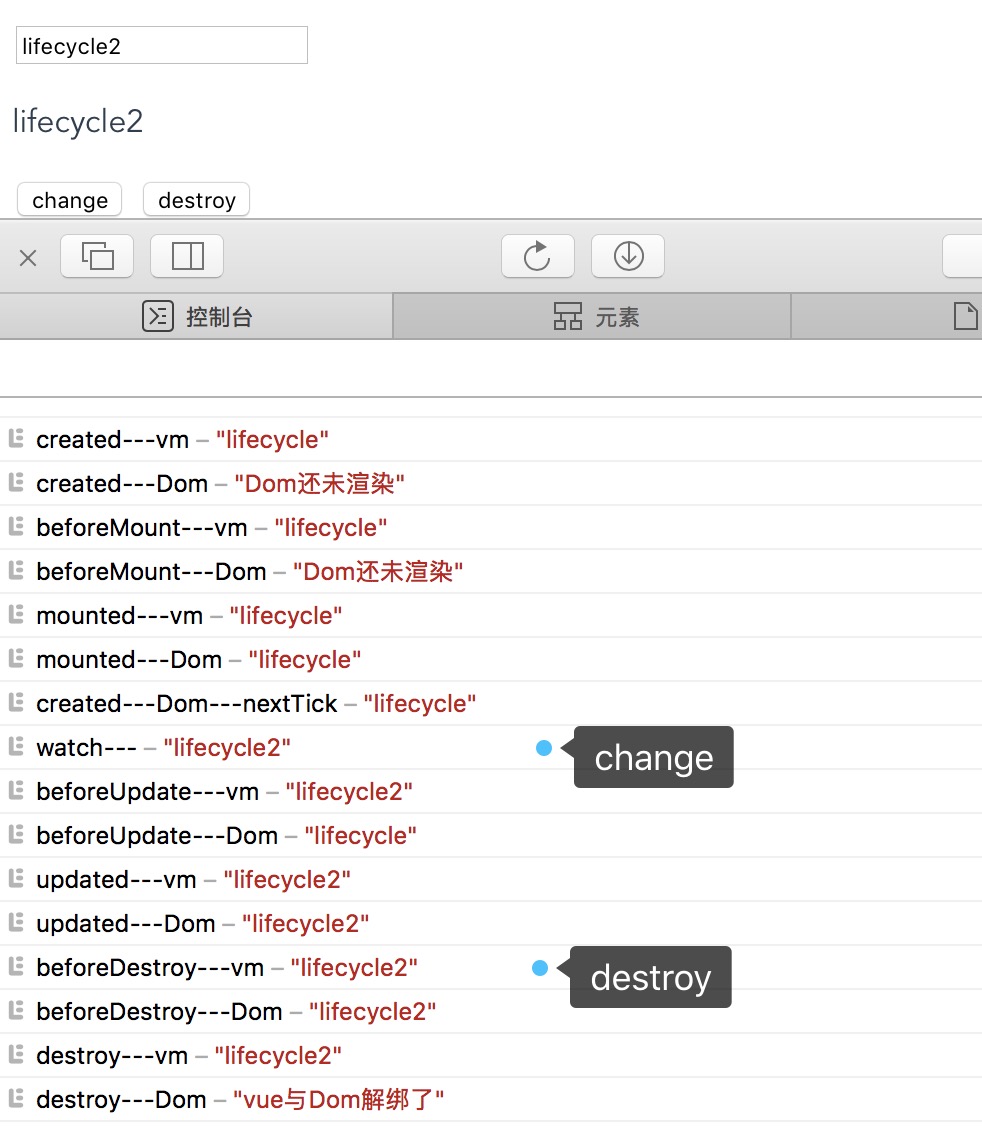
在created钩子函数中改,更改代码如下

1
2
3
4
5
6
7
8
created: function () {
console.log('created---vm', this.msg)
console.log('created---Dom', this.$refs.input ? this.$refs.input.value : 'Dom还未渲染')
this.$nextTick(function () {
console.log('created---Dom---nextTick', this.$refs.input ? this.$refs.input.value : 'Dom还未渲染')
})
this.msg = 'lifecycle4'
}

结果如下

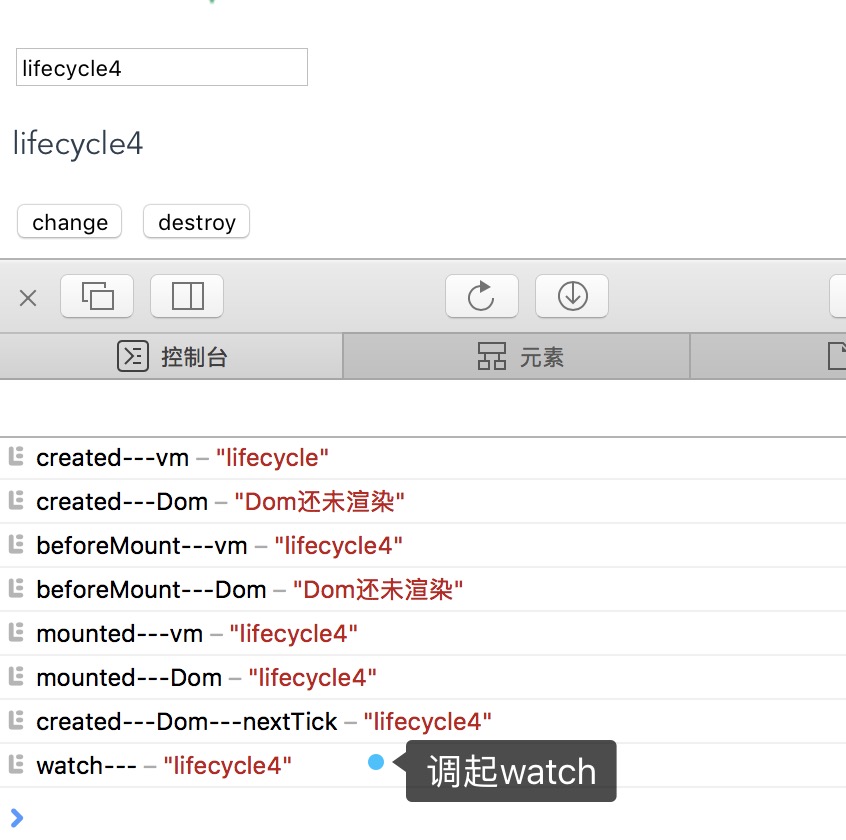
调用起watch是在意料之中,可能要注意的是调起它的时间,是在首次渲染结束后才会触发起watch,并且nextTick在其之前,所以说nextTick是在DOM完成后立即触发,这个立即很准确
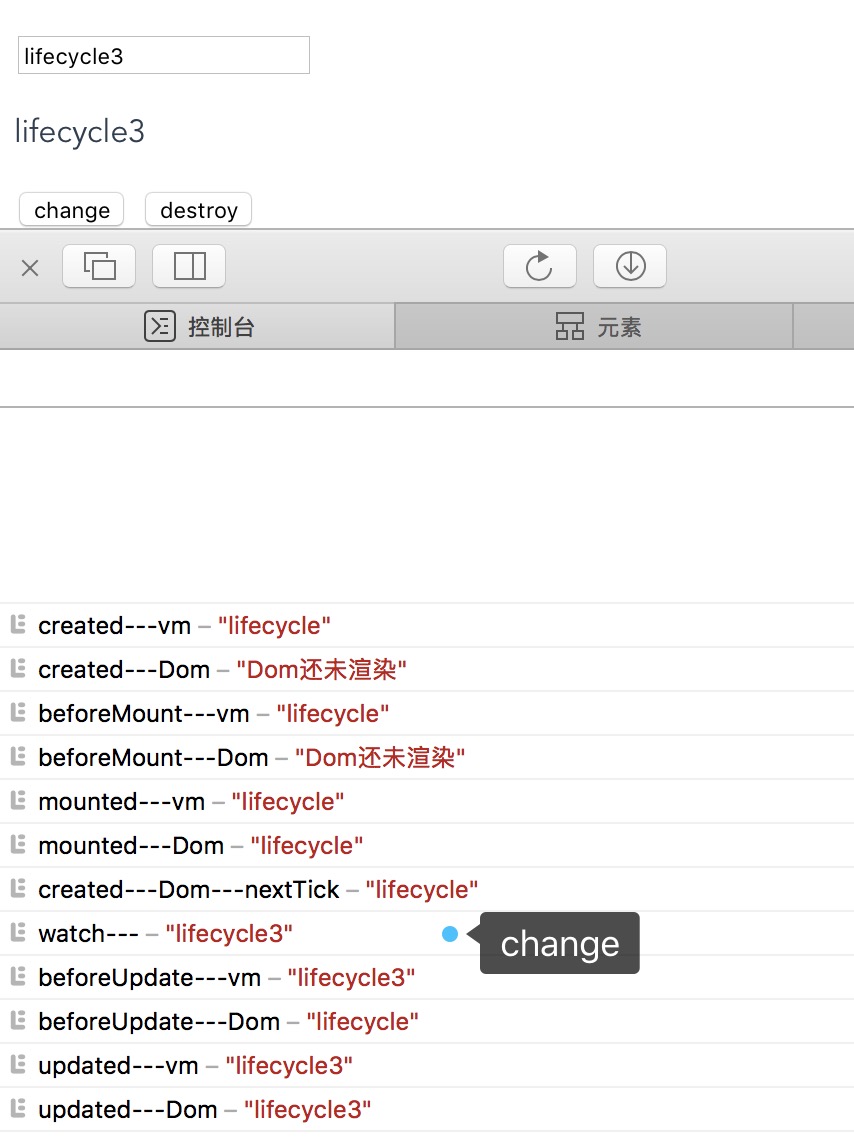
但是如果在mounted中改变的话,还会触发beforeUpdateupdated,因为更新钩子函数就是在mounted完成后每次更改数据来重新渲染DOM时触发

番外篇2:

补充子组件生命周期和父组件生命周期的交叉情况

上面的代码其实是子组件,只是我完全独立的看待它本身的生命周期,现在在父组件中,添加一些钩子函数以及props,代码如下:

1
2
3
4
5
6
<template>
<div id="app">
<img src="./assets/logo.png">
<router-view :message="message"></router-view>
</div>
</template>
1
2
3
4
5
6
7
8
9
10
11
12
13
14
15
16
17
18
19
20
21
22
23
24
25
26
27
28
<script>
export default {
name: 'app',
data () {
return {
message: 'this is props test'
}
},
beforeCreat: function () {
console.log('parent-beforeCreat-------------')
},
created: function () {
console.log('parent-created-------------')
},
beforeMount: function () {
console.log('parent-beforeMount-------------')
},
mounted: function () {
console.log('parent-mounted-------------')
},
beforeUpdate: function () {
console.log('parent-beforeUpdate-------------')
},
updated: function () {
console.log('parent-updated-------------')
}
}
</script>

结果如下

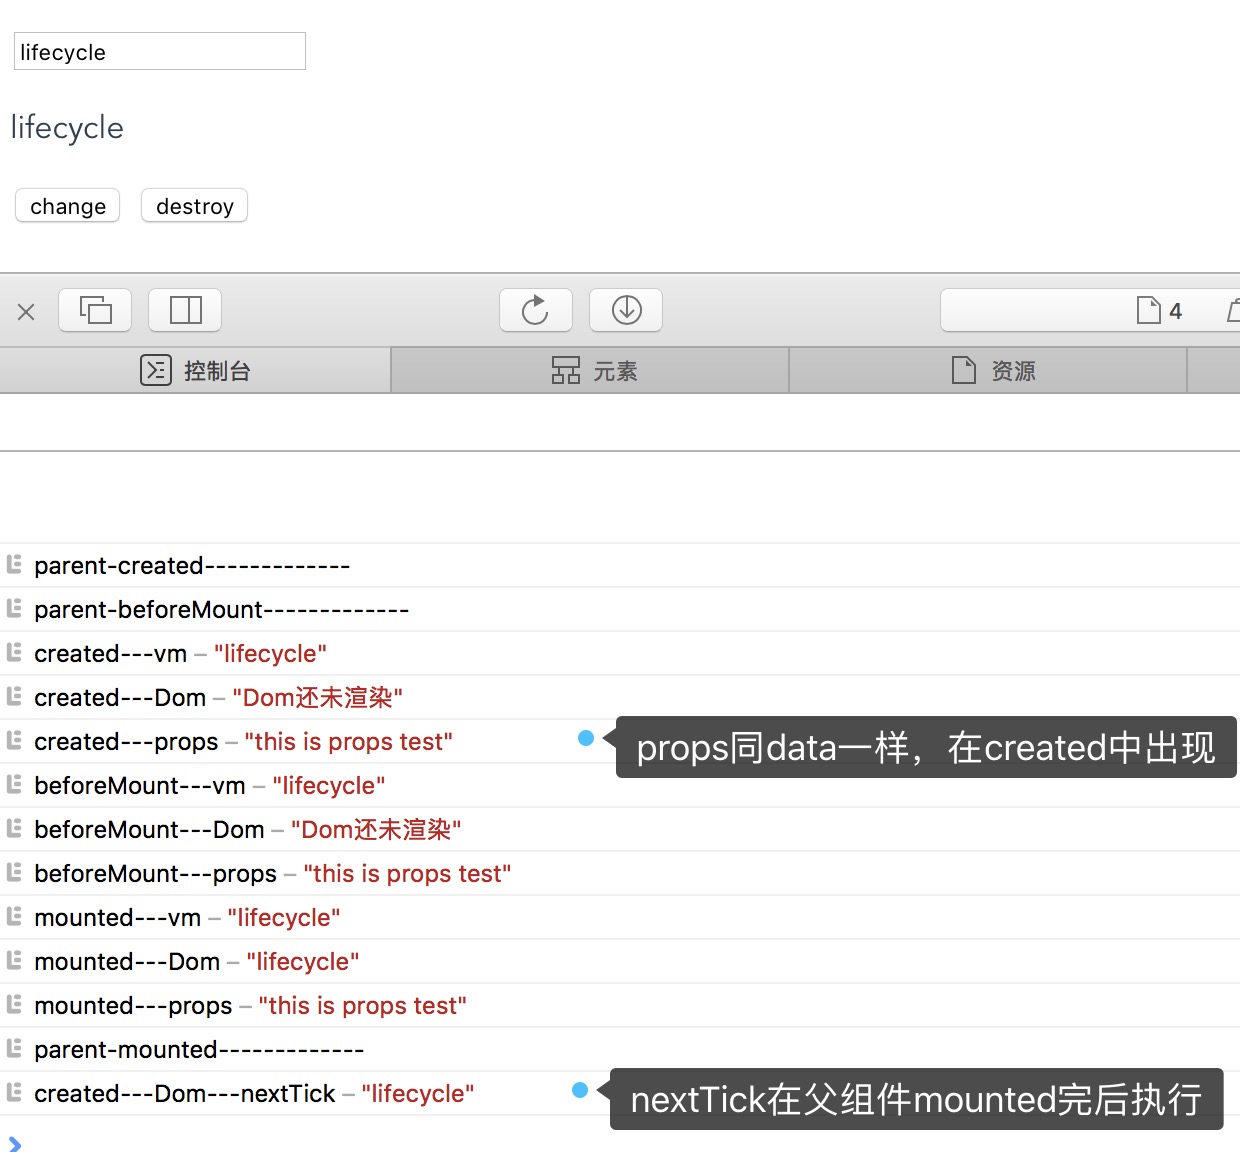
首先,props的出现周期和data是一样的,其次子组件的生命周期是在父组件的beforeMounted之后,父组件mounted之前执行完毕,并且nextTick在父组件mounted之后,即整个DOM渲染完之后再执行。

暂时这些,其他的研究可能需要在实际的开发中碰到了,以及深入的内容等到研究源代码的时候说吧~~