vue学习系列-自定义事件

真实案例

背景:Vue中使用cleave.js,格式化身份证输入,v-model语法糖中使用的input事件与Cleave中input事件冲突,引发学习Vue的自定义事件,重写v-model

利用了Vue的自定义事件创建自定义表单输入组件,使用v-model来进行数据双向绑定,避免和Cleave的input事件冲突,改为keyup事件,先上结果代码~

1
2
3
4
5
@html

<div id="app">
<cleave v-model="creditcard" :options="{blocks: [4, 4, 4, 4], delimiter: '-', numericOnly: true}"></cleave>
</div>
1
2
3
4
5
6
7
8
9
10
11
12
13
14
15
16
17
18
19
20
21
22
23
24
25
26
27
@javascript

Vue.component('cleave', {
template: '<input type="text" v-on:keyup="updateValue">',
props: ['value', 'options'],
mounted() {
this.cleave = new Cleave(this.$el, this.options)
this.cleave.setRawValue(this.value)
},
destroyed() {
this.cleave.destroy()
},
watch: {
value: 'updateInput'
},
methods: {
updateValue() {
var val = this.cleave.getRawValue()
if (val !== this.value) {
this.$emit('input', val)
}
},
updateInput() {
this.cleave.setRawValue(this.value)
}
}
})

自定义事件学习

记录自定义事件的学习,内容来自官方网址

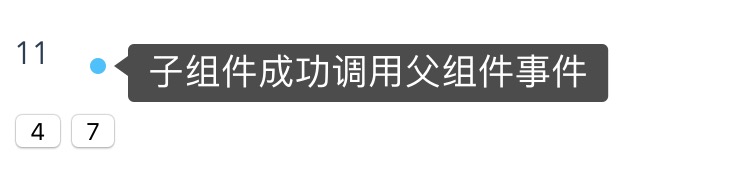
每个Vue实例都实现了事件接口,即使用$on(eventName) 监听事件;使用 $emit(eventName)触发事件,父组件也是通过自定义事件监听子组件的变化来实现子组件向父组件传递数据的(父组件向子组件传数据是props)

但是在模板里不能用$on监听子组件事件,要在模板中使用v-on监听,模仿官网写一个子组件向父组件传递数据的例子

子组件代码:

1
2
3
4
5
6
7
8
9
10
11
12
13
14
15
16
17
18
19
20
<template>
<button @click="increment">{{counter}}</button>
</template>

<script>
export default {
name: 'Counter',
data () {
return {
counter: 0
}
},
methods: {
increment: function () {
this.counter += 1
this.$emit('increment')
}
}
}
</script>

父组件代码:

1
2
3
4
5
6
7
8
9
10
11
12
13
14
15
16
17
18
19
20
21
22
23
24
25
26
27
<template>
<div>
<p>{{total}}</p>
<button-component v-on:increment="incrementTotal"></button-component>
</div>
</template>

<script>
import Counter from './Counter.vue'
export default {
name: 'Total',
components: {
'button-component': Counter
},
data () {
return {
total: 0
}
},
methods: {
incrementTotal: function () {
this.total += 1
}
}
}
</script>

结果:子组件利用$emit成功触发父组件在模版中监听的increment事件

知道$on,$emit自定义事件后,来看v-model语法糖,常规:

1
<input type="text" v-model="something">

实际可以拆分为两个方面:v-bind将value绑定一data中数据实现value跟随data改变而改变;v-on:input绑定一事件来实现data跟随value改变而改变

1
<input type="text" v-bind:value="something" v-on:input="something = $event.target.value">

ok,对于组件使用v-model,2.2.0+版本可以配置,就可以创建自定义的表单输入组件,配置v-model语法糖实现数据双向绑定,类比:

1
<custom-input v-model="something"></custom-input>
1
2
<custom-input v-bind:value="something" v-on:input="something=arguments[0]"></custom-input>
//something=arguments[0]这里就是之后$emit触发自定义事件会传参数

具体写一个自定义表单输入组件,上面代码基础直接加
父组件代码:

1
2
3
4
5
6
7
8
9
10
11
12
13
14
15
16
17
18
19
20
21
22
23
24
25
26
27
28
29
30
31
<template>
<div>
<p>{{total}}</p>
<button-component v-on:increment="incrementTotal"></button-component>
<custom-input v-model="inputValue"></custom-input>
</div>
</template>

<script>
import Counter from './Counter.vue'
import customInput from './custom-input.vue'
export default {
name: 'Total',
components: {
'button-component': Counter,
'custom-input': customInput
},
data () {
return {
total: 0,
inputValue: 0
}
},
methods: {
incrementTotal: function () {
this.total += 1
}
}
}
</script>

子组件代码:

1
2
3
4
5
6
7
8
9
10
11
12
13
14
15
16
17
18
19
20
<template>
<input type="text" ref="input" v-bind:value="value" v-on:input="updateValue($event.target.value)" >
</template>

<script>
export default {
name: 'custom-input',
props: ['value'],
methods: {
updateValue: function (value) {
const newValue = value.trim().slice(0, value.indexOf('.') === -1 ? value.length : value.indexOf('.') + 3)
if (newValue !== value) {
this.$refs.input.value = newValue
}
this.$emit('input', Number(newValue))
console.log(this.value)
}
}
}
</script>

结果如期望

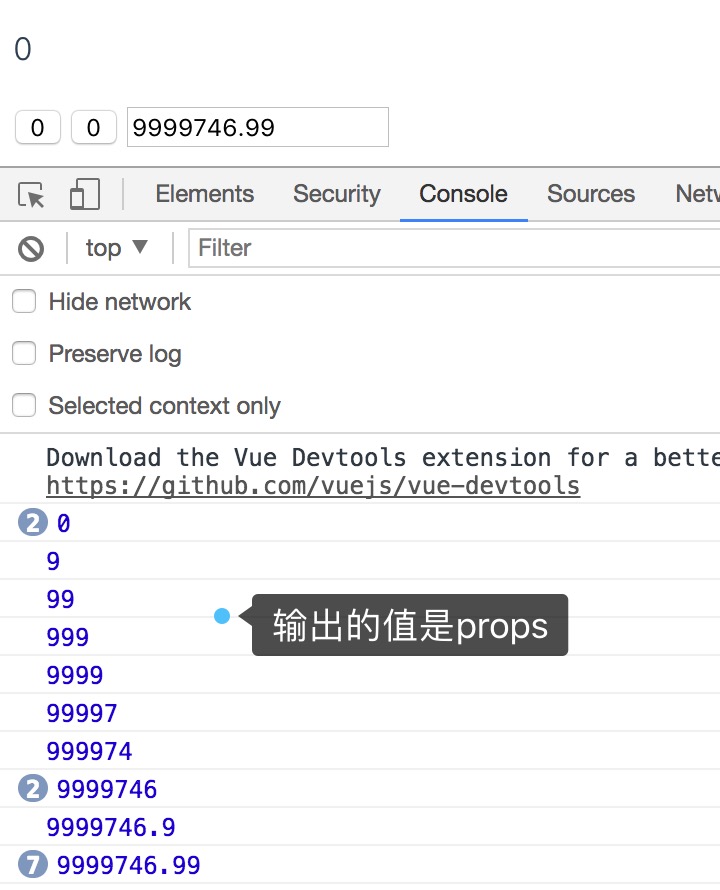
真实案例就理解了,同样是创建自定义表单输入组件,在组件中的input避免用input事件,转而用keyup事件,读下cleave代码,在自己的事件中调用当中的方法,以及相比上面的例子还多了一部分是data中value值变动时做了数据格式化